by Tom Barrett | Jan 12, 2022
Prevention Devices
Have Got Your Back
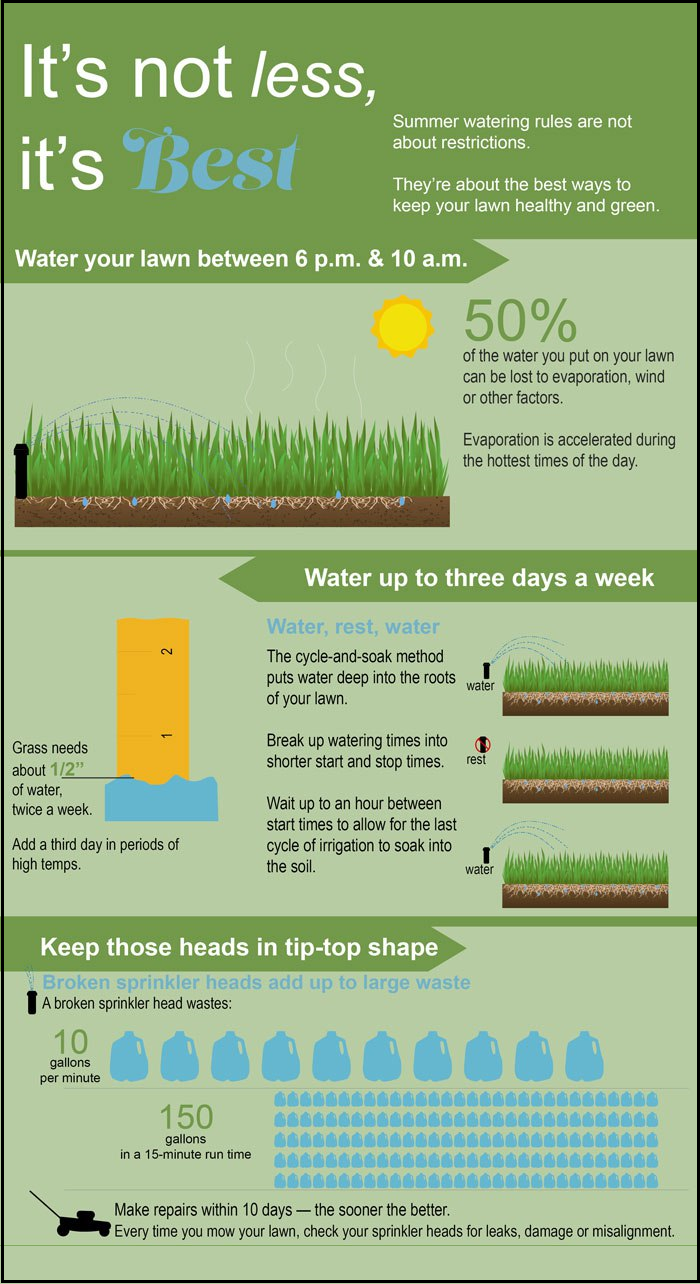
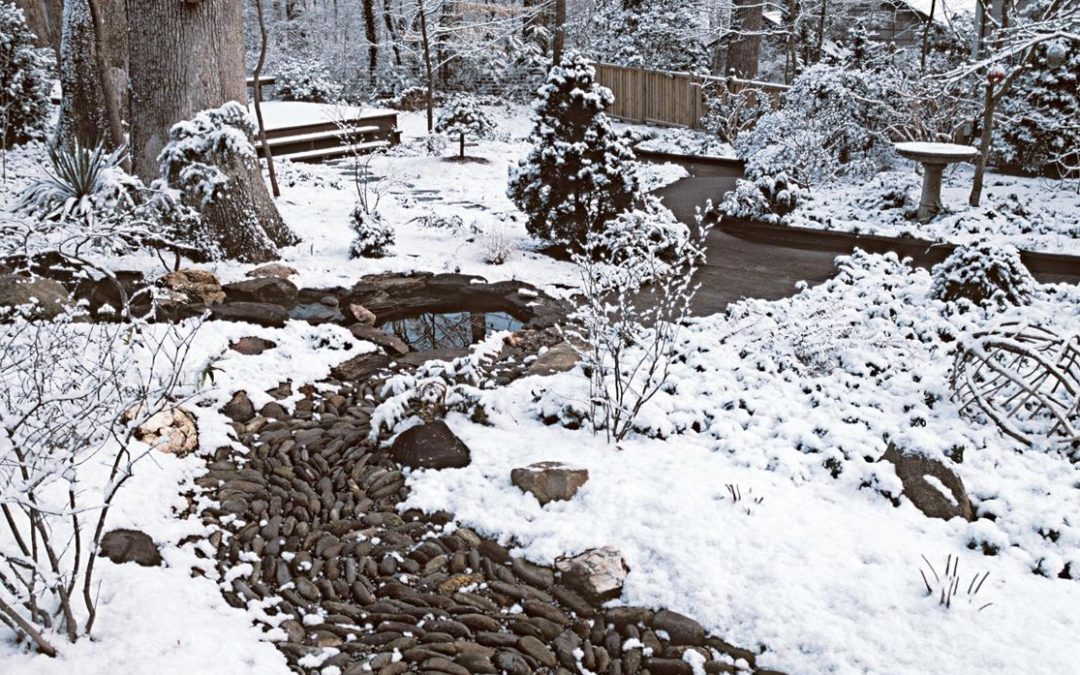
The U.S. plumbing code is designed to ensure that the water delivered to an irrigation system never returns to the potable water supply. But without a backflow prevention device, problems can occur, such as the following chilling tale:
A Backflow Horror Story
In December of 2016, the city of Corpus Christi, Texas, received a dirty water complaint from a large asphalt producer. Despite flushing the property’s water main twice, residents reported a “white sudsy liquid” flowing from their taps.
Because the asphalt company had failed to install a backflow preventer on its water line, the corrosive chemical Indulin AA-86 was entering the line whenever water pressure on the property rose higher than the pressure in the main. This caustic emulsifying agent can burn eyes, skin and respiratory tracts. And 24 gallons of it had leaked into the water supply. Indulin AA-86 cannot be boiled out of tap water, so the city had to place a four-day ban on water usage until the emergency passed.
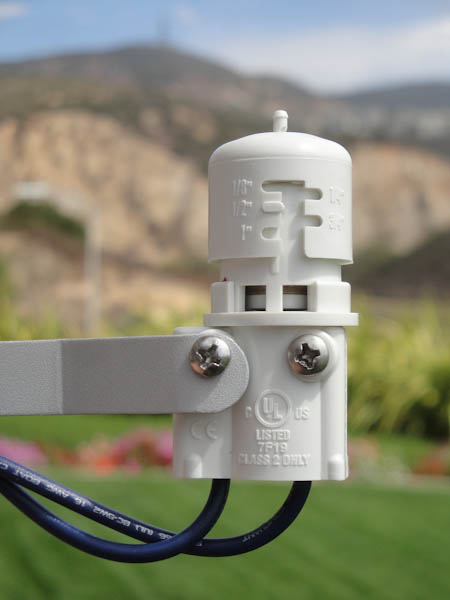
![]()

Degree of Hazard
“Degree of hazard” is a core concept in backflow terminology. It refers to the level of risk posed by a particular substance when it enters a water supply. An example of a low hazard would be food dye, which may be aesthetically unpleasant, but poses no threat to human health. Low hazard materials are also called “pollutants.”
Examples of high-hazard materials are motor oil, pesticides, fertilizers, and animal waste. These all pose a risk to human health, and are classified as “contaminants.”
Backflow incidents occur more often than you might think. That’s why an increasing number of municipalities are mandating the installation of backflow prevention devices – for residential as well as commercial properties.
Two Types of Backflow
There are two types of backflow incidents: backpressure and back-siphonage. Backpressure occurs whenever water pressure on a property becomes higher than the water pressure in the mains, forcing used water back into the system. Back-siphonage occurs whenever water pressure in the mains drops below that of the property, sucking non-potable water from the property’s water line and depositing it back into the mains.
Some backflow devices will prevent only one type of backflow, while others will prevent both.
A backflow incident involves three factors:
- A cross-connection between two water lines
- Hydraulic forces (either back-siphonage or backpressure
- A hazard, resulting in non-potable water.
Backflow Prevention Devices
While the public will be protected from any type of backflow device on a homeowner’s property, the homeowner himself will be protected by having a separate device for the irrigation system. Without it, the property owner could end up drinking toxins or water contaminated by bacteria.
The three most common backflow preventers are:
- Pressure Vacuum Breaker (PVB) — the simplest and least expensive device; prevents back-siphonage only.
- Double Check Valve Assembly (DCVA) – prevents both back-siphonage and backpressure; good for underground irrigation systems; not rated for conditions with a high degree of hazard.
- Reduced pressure zone (RPZ) – most complex and expensive device; prevents both back-siphonage and backpressure; good for conditions with a high degree of hazard.
All of these devices work to protect the entire irrigation system. A fourth type of backflow device, the atmospheric vacuum breaker (AVB), is installed on each individual zone.
Become a Backflow Tester
The Ohio Plumbing Code requires that every backflow prevention device must be tested at least once a year. If you’re already installing these devices for your customers, why not go the extra mile and become a certified backflow tester? Backflow testing is a lucrative business, especially now with increased demand for greywater and rainwater collection systems.
![]()
Backflow Training Centers
Here are the locations of Ohio’s major backflow training centers:
Here’s the process for becoming a certified backflow tester in the state of Ohio:
- Complete the Application for Backflow Tester Certification, provided by the Ohio Department of Commerce.
- Locate a state-authorized backflow training facility. (See box at right.) You must complete about 35 to 40 hours of training and pass the practical exam before you can move on to the next step.
- Pass the written exam, administered by the state of Ohio.
- Once you pass the written exam, you will receive by mail a three-year certificate, and your name will be entered into the Ohio backflow testing database. After three years, you must be recertified.
Here’s how Sean Mullarkey, of TriState Water Works, explains the certification process:
Sources:
Featured Image: Adobe, License Granted
Irrigation & Green Industry
American Backflow Prevention Association
IrrigationRepair.com
by Tom Barrett | Sep 11, 2019
Improve Your System’s Efficiency
and Avoid Costly Repairs
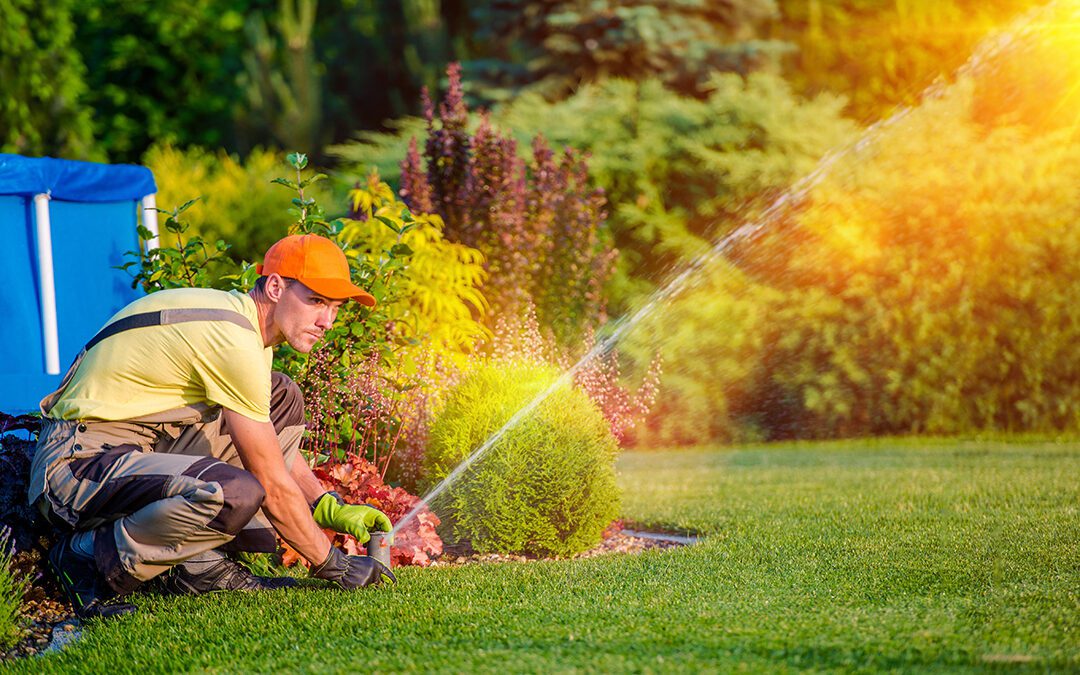
Did you know that your irrigation system accounts for between 50% and 75% of your home’s monthly water usage?
Did you also know that more plants die from overwatering than underwatering?
Those are just two of the many reasons that regular maintenance is needed to keep your sprinkler system running efficiently year after year. Here’s another: Damage from lawn equipment or improper winterization can result in costly leaks and other serious problems.
An Ounce of Prevention
Here are a few simple checks to perform on a monthly, annual or periodic basis to ensure your sprinkler system is operation at an optimal level:
Every Month During Growing Season…
Inspect the controller and make sure it’s plugged in and functioning.
Check the connection on all of the wires and sensors.
Adjust sprinkler head positions and spray patterns to avoid watering sidewalks or structures and to provide necessary clearance over growing plants.
Remove obstructions that prevent sprinklers from distributing water evenly.
Check the pressure. Pressure can change over time and negatively affect your system’s efficiency. If the pressure is too high, it’ll result in significant runoff.
Inspect your system for leaks — a huge water waster. This step requires the help of your irrigation contractor. He’ll not only check for leaks and broken or clogged spray heads; he can also advise you about common problems to watch for between visits.
–Article Continues Below–
Once a Year…
Winterize, winterize, winterize! This routine maintenance procedure is critical. Overlook it, and you can expect costly damage to your system. But this is something best left to the professionals. Your irrigation contractor has specialized equipment to flush out the water that could otherwise freeze, resulting in cracked pipes, valves and other parts. (See related article, “How to Winterize Your Landscape Irrigation System.”)
Get your back flow checked. Federal and state laws require that your backflow connection be tested annually by a state-certified tester. (This is typically part of the winterization process.)
Once in a While or As Needed…
Now and then, it’s a good idea to have your system audited. Hire a Certified Irrigation Auditor to conduct an audit and uniformity test. If your system is watering unevenly or improperly, he can make the necessary adjustments.
Replace your controller’s back-up battery whenever you replace your smoke alarm batteries.
Adjust the watering schedule to reflect the current season and irrigation needs of your landscape.
With the proper routine maintenance, your irrigation system will serve you well for seasons to come!
Sources:
Conserve H20
Alliance for Water Efficiency
by Tom Barrett | Mar 1, 2018
Sprinkler System Start-Up Tips
The warmth of spring means it’s time to prepare your landscape sprinkler system for another season of watering.
Hiring a qualified irrigation professional to perform tasks like spring start-up is always best, but experienced do-it-yourselfers, can follow these tips:
Timing Is Everything
First of all, you need to make sure spring has indeed sprung. The soil beneath your landscaping is always the last to thaw, so use a shovel to confirm that the ground is frost-free 12 inches down. Starting your sprinkler system while the ground is still frozen can result in damaged pipes. Is the ground still hard as a rock? Wait another week and try again.
Then check the settings on your sprinkler to make sure they’re appropriate for your landscape’s watering needs. Replace the back-up battery in the timer/controller, if necessary.
Go with the Flow
Before turning on any water to the system, double-check that all manual drain valves are returned to the “closed” position. When you first turn the water back on, be sure to open the system main water valve SLOWLY to allow pipes to fill with water gradually. Opening the water valve to quickly can result in a high-pressure surge called “water hammer,” which often causes burst pipes and damaged valves.
Check for rocks, dirt, sand and other types of debris that could block your sprinkler heads. And keep an eye out for spray heads that may have become buried with debris over the course of the winter.
Nozzles and sprinkler heads are designed to withstand normal wear and tear of irrigation, but not errant lawn mowers or snowplows. So be sure to replace all cracked, chipped or worn components. A broken or leaky sprinkler can wreak havoc on both your landscaping and water bills.
Valves and Pressure Gauges
The valves in your irrigation system are the system’s heart. It’s important to visually inspect each valve to determine that it’s operating properly. You can do this by manually activating all zones from the controller.
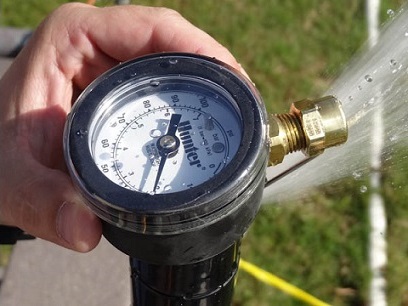
Also, make sure the water pressure is at a safe operating range. Too much pressure will result in cracked pipes, busted valves, sprinkler head leaks and inefficient watering.
A water pressure gauge is often helpful. These devices typically connect to a hose faucet and give you a good idea of the pressure in your irrigation system. (Suggested operating range is typically 40 -65 PSI.) Hint: If water is “misting” out of your sprinkler heads, your pressure is too high and should be reduced.
Think It’ll Rain?
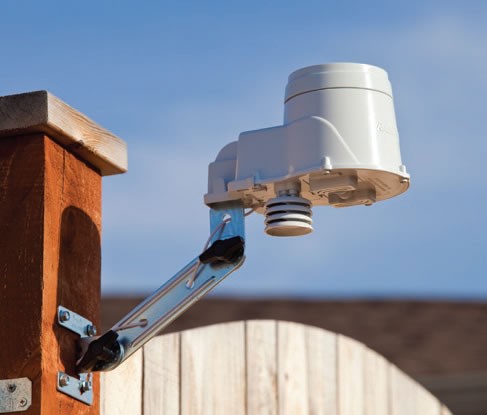
Most modern irrigation systems are equipped with a rain sensor. This device should also be checked prior to activating your system in the spring. Here’s how:
- First, consult the systems operator’s manual to determine the proper setting for testing your unit. (For example, some systems must be set to the “manual all stations” setting to test them. If that is the case with your system, you cannot test it on the “manual single station” setting.)
- After properly setting the irrigation system control, check the system to make sure it came on. (You may need a helper to assist you.)
- Once you have confirmed that the sprinkler is running, depress the plunger located on the top of the rain sensor. The sprinkler system should stop irrigating within a few seconds.
- If watering does not stop when you depress the plunger, you’ll have to troubleshoot the system. Confirm that all wiring connections on the sensor and on the sprinkler control unit are tight. Check to make certain that the jumper tab, also called a jumper wire, was removed when the rain sensor was hooked up to the control panel.
Also be aware that the disk inside a rain sensor can become clogged with dirt or insects, which can keep it from functioning properly. Consult your operator’s manual for the correct procedure to clean the disk.
A Word about Backflow
A backflow device has been installed on your irrigation system in accordance with Ohio state law. This device prevents a cross-connection from occurring between the drinkable and undrinkable water in your home.
Spring is a good time to have your backflow preventer tested, as annual testing of the device is required in the state of Ohio. This testing can only be done by individuals who have been certified by an approved testing school. Backflow testers must have at least 24 hours of training in the classroom and hands-on test lab.
To locate a certified backflow tester in your area, Click Here.
Leave It to the Pros
Again, it’s best to leave all spring start-up tasks to the professionals. A qualified service technician will go through your irrigation system zone by zone and check every irrigation spray pattern for optimum turf and plant coverage, as well as check each sprinkler head and valve for any leaks. He can also test and clean your rain or weather sensor to ensure top performance.
Lastly, the technician will program the controller for the proper irrigation schedule, based on your landscape and weather conditions, as well as neighborhood watering restrictions.
Sources:
Hunter Industries
Rainbird
SF Gate
by Tom Barrett | Nov 8, 2017
November Means It’s Time to Winterize
(Note: Portions of this article originally appeared in SportsTurf Magazine)
The dreary days of November remind us that it’s time to start thinking about preparing your irrigation systems for winter.
Here are some tips for winterizing an irrigation system:
Preventing Pipe Damage
Of course, water expands when it freezes. Since automatic irrigation systems are usually buried only about twelve inches below the surface of the soil, any water left in the system over the winter (even a mild winter) will certainly freeze. This causes damage to pipes, fittings, valves, and sprinklers. And this damage can be expensive and time-consuming to repair next spring. So, preventing winter damage by properly winterizing the irrigation system is important.
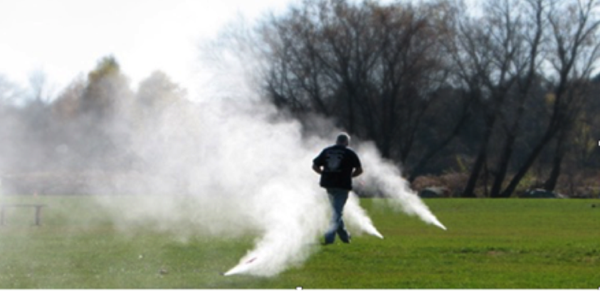
The following video clip demonstrates the consequences of failing to do so:
The most common method of winterization is to use compressed air to force water out of the irrigation system. However, some irrigation systems are equipped with automatic or manual drain valves. These do not require compressed air to winterize. Check with your installing contractor to determine if your irrigation system has automatic or manual drain valves. If you’re not sure, then go ahead and use compressed air. Using compressed air on an irrigation system equipped with automatic or manual drain valves will not harm the system components, and will ensure the irrigation system is properly winterized.
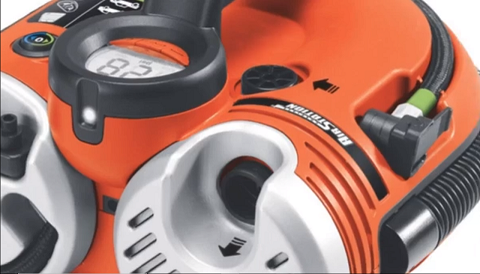
Selecting an Air Compressor
Air compressors are available in various sizes. A properly sized air compressor is critical in order do effectively and efficiently blow air into the irrigation system, forcing any water out. The most common portable air compressor (representing about 80% of the portable air compressors in use today) is the 185 portable air compressor. This machine is rated at 185 cfm at 100 psi at full load.
This type of compressor can be found through a contractors’ equipment rental shop, and it’s more than adequate for most residential and commercial irrigation systems. Smaller 5 h.p. electric air compressors, even if they’re 100 psi, do not deliver enough volume of air to adequately winterize an irrigation system.
How-To: Compressed Air Winterization
When using a compressor to winterize your system, follow these steps:
- Shut off the water to the system at the point of connection. The system shut-off valve may be either a ball valve or gate valve. It should be located in the basement or directly behind the water meter.
- Next, open a zone valve to relieve the system pressure.
- Attach the air hose from the air compressor to the blow-out point. The blow-out point is usually located directly behind the backflow device. The blow-out point may be a quick coupling valve, a hose bib, or a boiler drain.
A Note of Caution: The expanding air coming from the air compressor into the irrigation system will get hot and may melt the plastic pipe. Carefully check the temperature of the air hose connection at the blow-out point. Slow down or stop momentarily if it feels too hot! Cycling through each zone two or three times for short intervals will prevent too much heat buildup.
- Set the pressure regulator on the air compressor at 50 to 80 psi.
- On smaller residential systems, where the zones are typically about 10 gpm or less, open one electric remote control valve manually. Then cycle through all the other zones two to three minutes by manually opening each valve or by electrically operating each valve at the controller. Opening one valve manually will help to keep the air compressor from building up too much pressure, while assuring an adequate volume of air to thoroughly blow out all the water in the system. (On larger systems, it may not be necessary to open one valve manually.)
- Allow the air to flow through each zone until water and water vapor no longer appears from any sprinklers in the zone. Start with the zone with the highest elevation in the system or farthest from the point of connection. Blow out each zone successively toward the point of connection. It’s a good idea to cycle through each zone two times, to ensure no water is remaining.
How-To: Automatic Drain System Winterization
Some systems are equipped with automatic drains that open when the system pressure falls below 10 psi. For these systems, it is usually only necessary to turn off the water.
- Open a drain valve after the point of connection.
- Winterize the backflow device and controller (See “Backflow Preventer Winterization” below.)
Some irrigation systems incorporate automatic drain valves on the laterals with manual drain valves on the main line. The manual drain valves will be located in small valve boxes at the end and at low points on the main line. Open the drain valves, and allow the water to drain out completely. Then close the drain valve.
How-To: Manual Drain System Winterization
If your system is equipped with manual drain valves:
- Locate the drain valve for each zone and the main line. The manual drain is usually located in a small valve box at the end of the zone and at every low point. Also, the main line will have a manual drain at the end of the line and at every low point.
- Open each drain valve, allowing all the water to drain out, and then close the manual drains.
- Winterize the backflow device and controller.
How-To: Winterize the Backflow Preventer
The backflow preventer is the plumbing device attached to the outside of your house. It is the source of water to the irrigation system, and it can freeze and burst in only a few hours of below-freezing temperatures. So winterizing your backflow preventer is critical.
Here’s how:
- Turn off the main shut-off valve to the system.
- Using an adjustable wrench, remove the outlet drain plug or spigot on the outside piping.
- Turn valves to a 45-degree angle (half-open/half-closed position).
- Cover/wrap the backflow valve and all copper pipe with a large towel or blanket.
- Place 2-3 gallon bucket underneath drain and open the drain valve. Generally, 1-2 gallons of water will empty into the bucket. Once all the water has drained out of the pipe, close the drain valve.
How-To: Winterize the Controller and Rain Sensor
To winterize the irrigation controller, simply turn the controller to the off or “rain shutdown” position. (You can also disconnect the power and remove the battery, but this is not necessary.) Do not allow the controller to cycle through an irrigation schedule without water in the system.
If your irrigation system is equipped with a rain sensor or a soil moisture sensor, it’s not usually necessary to cover or remove the sensor for the winter. Check with the manufacturer to make sure your rain sensor does not require any special instructions for winterization.
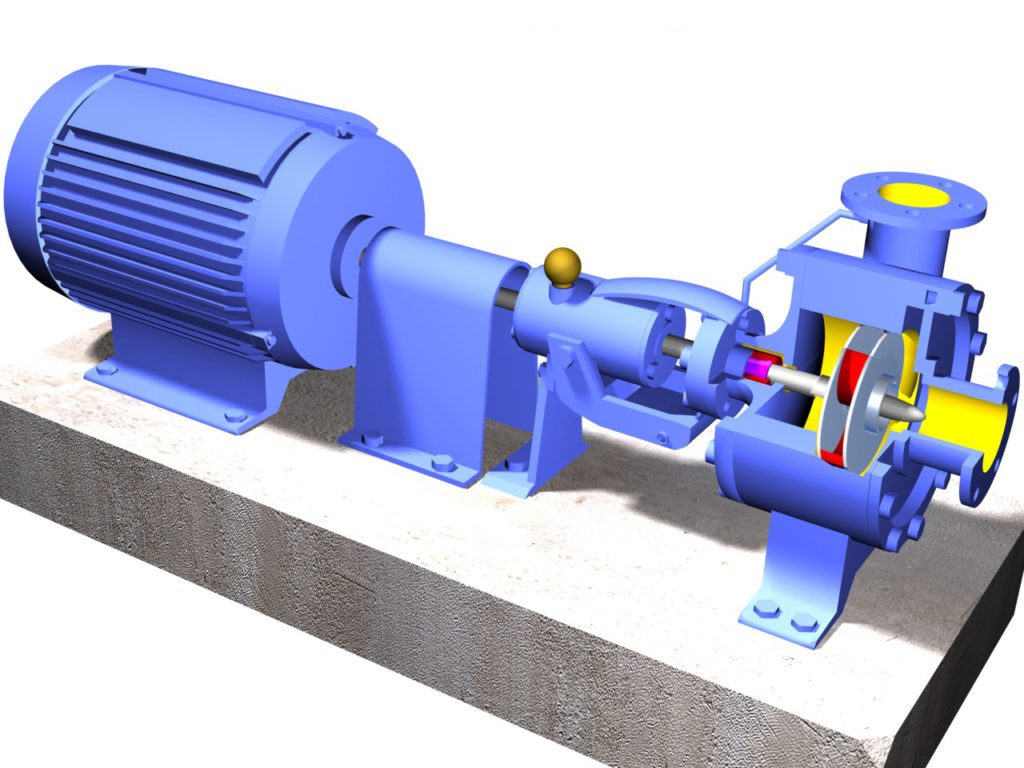
How-To: Winterize the Pump
If you have a submersible pump (i.e., located in a lake, stream or pond), the check valve at the pump must be removed to keep the discharge hose from freezing. The best way is to simply remove the pump and discharge hose from the water each winter, and reinstall in the spring.
If you have a centrifugal pump, follow these steps:
- Remove the drain valve (located at the base of the pump housing) and store it for the winter.
- Disconnect the power supply, to prevent the pump from being accidentally turned on without any water. (A pump running without water will quickly burn up.)
- If the pump is drawing water from a lake or stream, you must remove the intake hose or suction line completely from the water and store it for the winter.
- If a check valve is located on the discharge side of the pump, it too must be removed and stored for the winter.
Leave It to the Pros
As you can see, preparing an irrigation system for winter can be a complicated process. A knowledgeable professional is essential to minimize damage caused by freezing. An improperly winterized irrigation system can be an expensive proposition next spring.
by Tom Barrett | Nov 1, 2016
November: Time for Winterizing
The dreary days of November remind us that it’s time to start thinking about winterizing your irrigation system.
Water expands when it freezes. Since automatic irrigation systems are usually buried only about twelve inches below the surface of the soil, water left in an irrigation system in freezing climates over the winter, even a mild winter, will certainly freeze — causing damage to pipes, fittings, valves, and sprinklers. Damage caused by a frozen irrigation system can be expensive and time consuming to repair next spring. Preventing winter damage by properly winterizing the irrigation system is important.
Using compressed air to force water out of the irrigation system is the most common method of winterization. However, irrigation systems equipped with automatic or manual drain valves do not require compressed air to winterize. Only the installing contractor will know if an irrigation system is equipped with automatic or manual drain valves.
Selecting an Air Compressor
Air compressors are available in various sizes. A properly sized air compressor is critical in order do effectively and efficiently blow air into the irrigation system, forcing any water out. The most common portable air compressor (representing about 80% of the portable air compressors in use today) is the 185 portable air compressor. This machine is rated at 185 cfm at 100 psi at full load.
This type of compressor can be found through a contractors’ equipment rental shop, and it’s more than adequate for most residential and commercial irrigation systems. Smaller 5 h.p. electric air compressors, even if they’re 100 psi, do not deliver enough volume of air to adequately winterize an irrigation system.
How-To: Compressed Air Winterization
When using a compressor for winterizing your system, follow these steps:
- Shut off the water to the system at the point of connection. The system shut-off valve may be either a ball valve or gate valve. It should be located in the basement or directly behind the water meter.
- Next, open a zone valve to relieve the system pressure.
- Attach the air hose from the air compressor to the blow-out point. The blow-out point is usually located directly behind the backflow device. The blow-out point may be a quick coupling valve, a hose bib, or a boiler drain.
A note of caution: The expanding air coming from the air compressor into the irrigation system will get hot and may melt the plastic pipe. Carefully check the temperature of the air hose connection at the blow-out point. Slow down or stop momentarily if it feels too hot! Cycling through each zone two or three times for short intervals will prevent too much heat buildup.
- Set the pressure regulator on the air compressor at 50 to 80 psi.
- On smaller residential systems, where the zones are typically about 10 gpm or less, open one electric remote control valve manually. Then cycle through all the other zones two to three minutes by manually opening each valve or by electrically operating each valve at the controller. Opening one valve manually will help to keep the air compressor from building up too much pressure, while assuring an adequate volume of air to thoroughly blow out all the water in the system. (On larger systems, it may not be necessary to open one valve manually.)
- Allow the air to flow through each zone until water and water vapor no longer appears from any sprinklers in the zone. Start with the zone with the highest elevation in the system or farthest from the point of connection. Blow out each zone successively toward the point of connection. It’s a good idea to cycle through each zone two times, to ensure no water is remaining.
How-To: Automatic Drain System Winterization
Some systems are equipped with automatic drains that open when the system pressure falls below 10 psi. For these systems, it is usually only necessary to turn off the water.
- Open a drain valve after the point of connection.
- Winterize the backflow device and controller (See “Backflow Preventer Winterization” below.)
Some irrigation systems incorporate automatic drain valves on the laterals with manual drain valves on the main line. The manual drain valves will be located in small valve boxes at the end and at low points on the main line. Open the drain valves, and allow the water to drain out completely. Then close the drain valve.
How-To: Manual Drain System Winterization
If your system is equipped with manual drain valves:
- Locate the drain valve for each zone and the main line. The manual drain is usually located in a small valve box at the end of the zone and at every low point. Also, the main line will have a manual drain at the end of the line and at every low point.
- Open each drain valve, allowing all the water to drain out, and then close the manual drains.
- Winterize the backflow device and controller (See “Backflow Preventer Winterization” below.)
How-To: Backflow Preventer Winterization
The backflow preventer is the plumbing device attached to the outside of your house. It is the source of water to the irrigation system, and it can can freeze and burst in only a few hours of below-freezing temperatures. So winterizing your backflow preventer is critical.
Here’s how:
- Turn off the main shut-off valve to the system.
- Using an adjustable wrench, remove the outlet drain plug or spigot on the outside piping.
- Turn valves to a 45-degree angle (half-open/half-closed position).
- Cover/wrap the backflow valve and all copper pipe with a large towel or blanket.
- Place 2-3 gallon bucket underneath drain and open the drain valve. Generally, 1-2 gallons of water will empty into the bucket. Once all the water has drained out of the pipe, close the drain valve.
How-To: Controller and Rain Sensor Winterization
To prepare the irrigation controller for winter, simply turn the controller to the off or “rain shutdown” position. (You can also disconnect the power and remove the battery, but this is not necessary.) Do not allow the controller to cycle through an irrigation schedule without water in the system.
If your irrigation system is equipped with a rain sensor or a soil moisture sensor, it’s not usually necessary to cover or remove the sensor when winterizing. Check with the manufacturer to make sure your rain sensor does not require any special instructions in preparation for winter.
How-To: Pump Winterization
If you have a submersible pump (i.e., located in a lake, stream or pond), the check valve at the pump must be removed to keep the discharge hose from freezing. The best way is to simply remove the pump and discharge hose from the water each winter, and reinstall in the spring.
If you have a centrifugal pump, follow these steps:
- Remove the drain valve (located at the base of the pump housing) and store it for the winter.
- Disconnect the power supply, to prevent the pump from being accidentally turned on without any water. (A pump running without water will quickly burn up.)
- If the pump is drawing water from a lake or stream, you must remove the intake hose or suction line completely from the water and store it for the winter.
- If a check valve is located on the discharge side of the pump, it too must be removed and stored for the winter.
Leave It to the Pros
As you can see, winterizing an irrigation system can be a complicated process. A knowledgeable professional is essential to minimize damage caused by freezing. An improperly winterized irrigation system can be an expensive proposition next spring.


 First, consult the systems operator’s manual to determine the proper setting for testing your unit. (For example, some systems must be set to the “manual all stations” setting to test them. If that is the case with your system, you cannot test it on the “manual single station” setting.)
 Here’s how: